
Save money and protect your car. Learn how to install a dashcam front rear system safely with our step-by-step DIY guide. Start wiring now!
You’ve just bought a dual-channel dash cam to protect your vehicle. Whether you picked up a premium kit from Bankstown Sound or ordered one online, it’s likely sitting in the box, shiny and new. But now you’re staring at a tangle of long cables, plastic pry tools, and sticky pads, wondering, “What have I gotten myself into?”
Here is the reality: Professional installation can cost anywhere from $150 to $300. Worse yet, a lazy installer might route cables over your airbags, turning a safety device into a potential hazard. If you leave the wires dangling yourself, it’s not just ugly—it’s a distraction that could cause an accident.
But you can do this yourself, and you can do it better.
Installing a dashcam front rear system doesn’t require a degree in electrical engineering. With a little patience and the right technique, you can achieve a “factory-finish” look where no wires are visible. In this guide, I will walk you through the exact process to install your dual dash cam safely, effectively hide the cables, and ensure your car remains protected 24/7.
Quick Guide: How to Install Front and Rear Dashcams
If you are ready to start, here is the high-level process to get your system running:
- Clean the windshields: Use alcohol to ensure a strong bond for the adhesive mounts.
- Mount the cameras: Place the front cam behind the rearview mirror and the rear cam top-center.
- Plan the cable route: Decide if you will route cables along the headliner (roof) or floorboards.
- Tuck the front power cable: Run the wire across the headliner and down the A-pillar (behind the airbag).
- Route the rear connection cable: Run the long cable from the front unit to the back window.
- Manage excess wire: Bundle extra cabling inside the kick panel or glove box area.
Power up and test: Connect to the power source (cigarette lighter or fuse box) and format the SD card.
- Quick Guide: How to Install Front and Rear Dashcams
- What You Need Before You Start
- Step 1: Positioning Your Cameras Perfectly
- Step 2: Routing the Front Power Cable (The Safe Way)
- Step 3: Tackling the Rear Camera Connection
- Step 4: Handling the Power Source (Plug vs. Hardwire)
- Step 5: Final Setup and Testing
- Conclusion
- Frequently Asked Questions
What You Need Before You Start
You don’t need a full mechanic’s garage, but having these tools handy will save you frustration.
- Trim Removal Tool: Usually included with the camera, but a sturdy plastic pry tool is essential for tucking wires without damaging your car’s interior.
- Glass Cleaner & Microfiber Cloth: For prepping the mounting surface.
- Cable Clips/Zip Ties: To bundle excess wire.
- Electrical Tape: To secure loose connections.
- Socket Wrench (Optional): Required if you are hardwiring to the fuse box or removing A-pillar bolts.
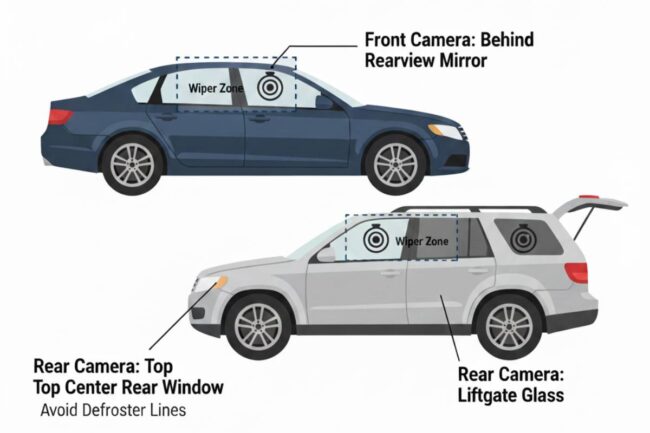
Step 1: Positioning Your Cameras Perfectly
Placement is everything. If you mount the camera too low, it obstructs your view (and may be illegal in some states). If you mount it too high, the tint strip might block the lens.
For the Front Camera: The ideal spot is directly behind the rearview mirror. This hides the body of the camera from the driver’s seat, ensuring your view isn’t cluttered. Ensure the lens is centered on the windshield.
For the Rear Camera: Place this at the top center of the rear windshield.
- Sedans: Mount it high on the fixed glass.
- Hatchbacks/SUVs: You must mount it on the glass of the liftgate. Note: Avoid placing the adhesive directly on top of a heater grid line (defroster line), as removing it later could damage the electrical heating element.
Step 2: Routing the Front Power Cable (The Safe Way)
This is where most people get nervous, but it is straightforward if you take your time. You are effectively pushing the wire into the gap between the glass and the roof liner.
- Start at the Camera: Plug the power cable into the front unit. Leave a little slack (2-3 inches) so the plug isn’t under tension.
- Tuck into the Headliner: Use your trim tool to gently pry the edge of the headliner down and push the cable up inside. Apply the mindset of an interior designer: if you can see the wire, the job isn’t finished yet. Work your way toward the passenger side A-pillar.
- The A-Pillar Airbag Safety Check: Most modern cars have side-curtain airbags inside the A-pillar (the post between the windshield and the side window).
- Do NOT just tuck the wire over the top of the pillar cover. If the airbag deploys, the cable could snap or become a projectile.
- The Correct Method: You should remove the A-pillar cover (usually 1 or 2 bolts) and zip-tie the wire behind the airbag assembly, following the existing factory wiring loom.
Step 3: Tackling the Rear Camera Connection
Installing the rear dashcam is more time-consuming because you have to route a thick cable the entire length of the car.
Routing Strategy: I recommend running the rear cable along the roofline (headliner) rather than the floor. It avoids foot traffic damage and is usually a straighter shot.
- Connect at the Front: Plug the rear connecting cable into the front unit.
- Run Along the Side: Continue tucking the wire along the top of the doors. You can usually push the wire into the weatherstripping (the rubber seal around the door frame). The rubber pulls down easily and hides the wire perfectly.
- The B-Pillar and C-Pillar: Use your trim tool to guide the wire across the pillars separating the doors.
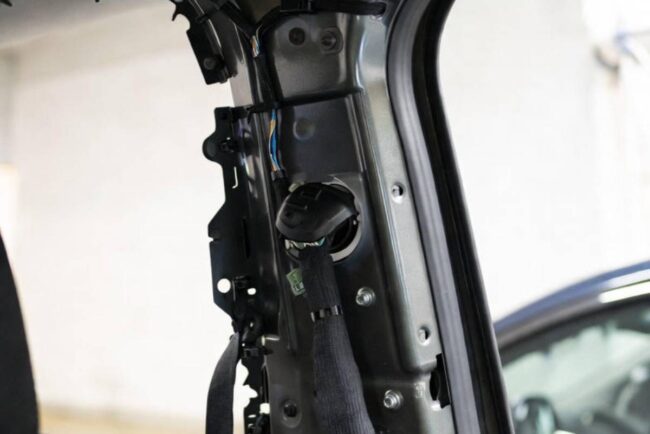
Special Instruction for Hatchbacks/SUVs: When you reach the back, you will see a rubber grommet (hose) connecting the car body to the liftgate. This carries the brake light and wiper fluid wires.
- Do not drape the wire across the gap. It will pinch and break when you close the trunk.
- The Pro Move: You must feed the dashcam cable through this rubber grommet. Squeeze the grommet to pop the ends out, use a rigid guide (like a coat hanger or a specialized snake tool) to pull the connector through, and then reseal the grommet. This ensures the install is waterproof and pinch-proof.
Step 4: Handling the Power Source (Plug vs. Hardwire)
You have two main options for powering your system.
Option A: Cigarette Lighter (Easiest) Simply run the front power cable down the passenger side kick panel, under the glove box, and plug it into the 12V socket.
- Pros: fast, no tools required.
- Cons: Looks messy near the center console; usually turns off when the car is off (no parking mode).
Option B: Hardwiring to the Fuse Box (Best for Parking Mode) If you want your camera to record hit-and-runs while parked, you need a hardwiring kit.
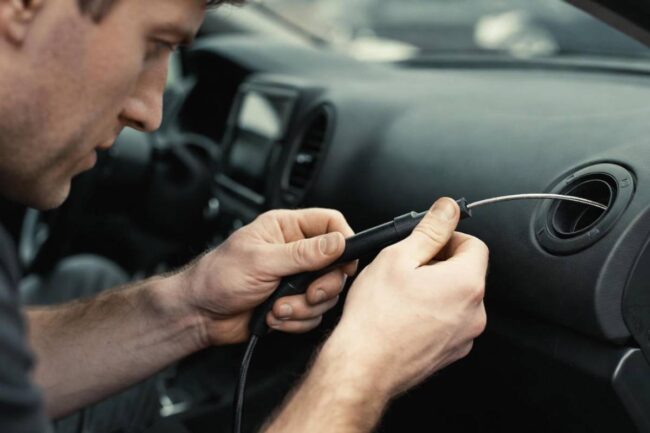
- Locate your interior fuse box (usually under the dashboard on the driver or passenger side).
- Use a circuit tester to find two fuses:
- ACC Fuse: Power is on only when the key is turned (e.g., Radio or Cigarette Lighter).
- Constant Fuse: Power is on all the time (e.g., Hazard lights or Interior dome light).
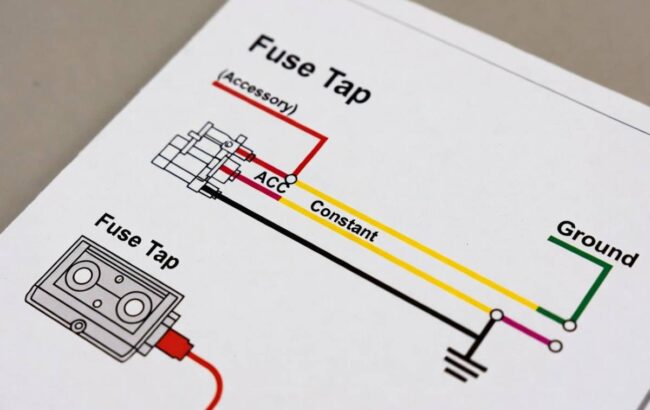
- Use Fuse Taps (Add-a-circuit) to plug the hardwire kit into these slots.
- Connect the ground wire (black C-shaped ring) to an unpainted metal bolt on the car’s chassis.
Step 5: Final Setup and Testing
Before you tidy up your tools, start the engine.
- Check Power: Do both cameras turn on?
- Check Orientation: Look at the live feed. Is the rear camera upside down? (Most apps have a “flip image” switch).
- Format the SD Card: This is crucial. Always format the card inside the camera to create the proper file architecture.
- Set the Date/Time: Ensure your timestamps are accurate for legal evidence.
Once verified, bundle any excess wire using zip ties and tuck it up under the dashboard or behind the glove box.
Conclusion
Installing a front and rear dashcam system might take you an hour or two, but the payoff is immense. You have saved hundreds of dollars in labor fees, and more importantly, you have the peace of mind that your install is safe and customized to your vehicle.
Whether you are driving in rush hour traffic or parked at a busy shopping mall, your car now has 360-degree surveillance. You aren’t just a driver anymore; you are a protected car owner.
Are you planning to hardwire your dashcam for Parking Mode, or stick to the standard 12V plug? Let me know in the comments below!
COMMENTS